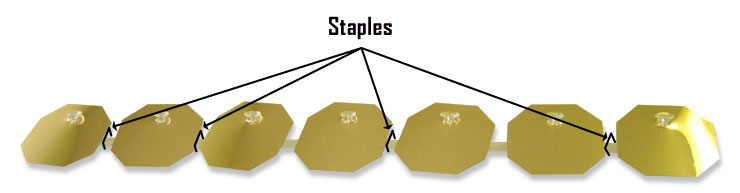
spangley boards
Installation
Sequins are such a versatile material that it can be used on many different types of signs, displays, floats, art work and scenery backgrounds. It is easy to install on wood sintra, plastic, metal and fabrics.

Installation Methods:
There are three basic methods for installing Sequins. They are Stapling, Taping and Gluing. Each of these proven techniques are explained below.
Stapling Sequins
Sequins can be stapled onto wood or any surface which staples can penetrate. Be sure to use rust-proof (stainless steel) 3/8 inch staples for outdoor applications. Stapling is the fastest and most cost efficient way of installing Sequins. With a power staple gun, 80 to 120 lineal feet of Sequins can be installed in one hour.
  • For a rapid and exact installation, you may want to rule lines with chalk or use a hand held spacer.
  • With the power stapler, straddle the backing strip and staple about 3 or 4 staples per one foot strip.
  • When stapling Sequins, have the backing strips go either in a horizontal direction (i.e. install Sequins from the top to the bottom) or in a vertical direction (install Sequins from the left to the right).
  • Letters should be at least 10 to 12 inches high and the stroke should take at least two rows of Sequins.
  • Space the 7/8 inch (small) strips about 1 inch on centre. (So the discs don't touch - Then the wind will be able to move them)
    Space the 1-1/2 inch (large) strips about 1-3/4 inches on centre.
  • Never let the discs hang over the painted copy.
 
Optimum staple positions:


Taping Sequins
 
Use a strong bonding, all weather durable, double sided tape.
 
Gluing Sequins
  • When using glue, we advise you to follow carefully the instructions of the glue manufacturer. As there are many excellent adhesives on the market choose the glue to fit the specific requirements of the job. In most cases, choose a fast tacking glue that dries quickly to a firm bond. Test any glue first to confirm adhesion.


© REFLECTO-LITE, All rights reserved. Legal